Monday, January 28, 2013

Window With A View

This blog post is bittersweet because it completes my six month commitment as a member of the Arnold Grummer Design Team. Back in August of 2012 I started posting two projects a month for Arnold Grummer's Paper Making. The products have been fantastic, and the encouragement from the nice folks at Arnold Grummer's Paper Making, and my fellow design team members, has been a real blessing. I wish them all nothing but the best in everything they do. For all you papercrafter's, I'm sure I'll still be doing paper projects from time to time, amidst the other creative ideas I'll be posting every week : )

This week's project is a Trifold Window Card embellished with beads. I adapted this project from an idea I liked in the ultimate papercraft bible. The creative possibilities are endless for designing your own card.  

Here's what you'll need to make yours:


Thread your needle and slip on your first bead.

Then thread the other end of the embroidery thread through the eye of the needle in the same direction as the end your threaded first.

Your bead should be sitting at the bottom of a loop now.

Push your needle through the card above the top of the window, in the center, from front to back. Not too close to the edge of the window or the paper will break.

Now gently pull the thread taut, and the bead will be flush with the paper.

Begin stringing the beads on the until they match the length of the window.

Once you've reached the bottom of the window, push the needle through the card, in the center, from back to front this time.


From here you can leave a few beads dangling at different lengths, choose a charm to hang from the end, or anything you can think of really. I chose a metal plate stamped with an inspirational message and attached it to the card with embroidery thread using basic sewing skills.

This was an easy, inexpensive project that was fun and turned out great. Who wouldn't love to receive this card? Or you could just give it to yourself : )
Visit us on Facebook at http://www.facebook.com/MyCreativeMommy and click the "Like" box to become a fan and receive regular updates!


Follow us on Pinterest at http://pinterest.com/mycreativemommy

There are about 196 countries in the world, and my goal is to take the whole world on a creative journey one project at a time. So I want to offer many thanks to all my readers in 77 different countries so far... 

The United States, Israel, Canada, Germany, Australia, the United Kingdom, Russia, France, Malaysia, Italy, the Bahamas, the Philippines, Sweden, Egypt, Columbia, the Netherlands, Spain, the Sudan, Turkey, Mexico, Moldova, Denmark, China, Vietnam, Singapore, Thailand, the Czech Republic, the Ukraine, South Africa, India, Taiwan, Panama, Serbia, Latvia, Argentina, United Arab Emirates, Bosnia and Herzegovina, 
New Zealand, Japan, Bangladesh, Brazil, Switzerland, Bulgaria, Saudi Arabia, Lebanon, Chile, 
Romania, Hungary, Portugal, Indonesia, Guernsey, South Korea, Pakistan, Greece, 
Hong Kong, Poland, Slovenia, Lithuania, Ireland, Belgium, Venezuela, Sri Lanka, Macedonia, 
Trinidad & Tobago, Peru, Ghana, Estonia, Dominica, Nepal, Norway, Slovakia, Croatia, Algeria, 
Finland, Mongolia, Myanmar [Burma], Lesotho, and Qatar!


Many Blessings,
Jana : )


Wednesday, January 23, 2013

Knitting A Hat On A Loom (and adding a pom pom!)


Knitting keeps me humble. It does not come easy to me in the least. I have tried to knit on my own to no avail. I have taken knitting classes with very limited success. I admire women who can knit effortlessly while talking or watching television and still produce these beautiful, flawless blankets, hats, scarves and sweaters. I did knit a baby hat once, but I found myself gripping the knitting needles with white knuckles and holding my breath. Still, I long to knit. So I keep trying.

At the recommendation of one of My Creative Mommy's facebook fans, I decided to try a knitting loom. I jumped in with a 
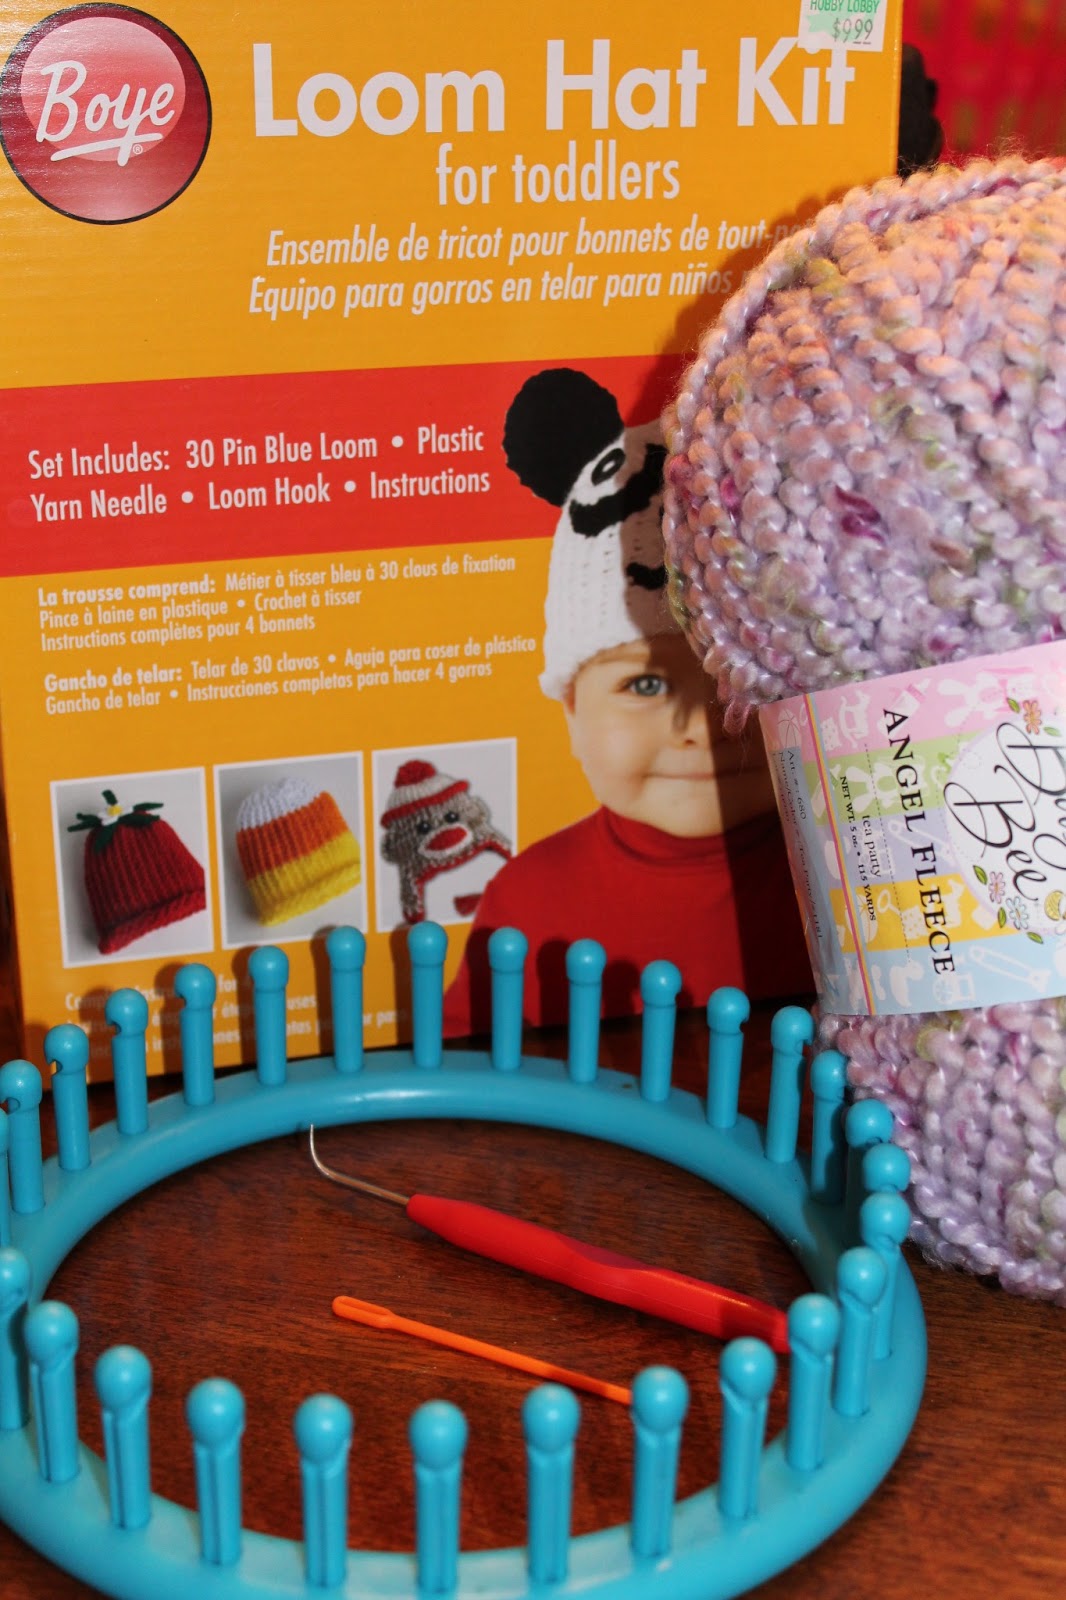
Boye Loom Hat Kit for toddlers, since I happen to have one of those running around my house. I took my baby girl to Hobby Lobby where she picked out a super soft, chunky yarn and I grabbed the knitting loom.

The end result? Easy and awesome! See for yourself : )

Here's what you'll need to make yours:


  • One Boye Loom Hat Kit
  • Yarn (kit calls for #4 medium yarn. I used #5 for this project)
  • Scissor
Start by tying the yarn to the anchor peg with a slip knot, or any knot. Just don't make your knot too tight because you'll have to untie it after you've knitted a few rounds on your loom.

Next we are going to begin by "casting on/e-wrapping our yarn onto the loom. It is called e-wrap because when you cast on the yarn it is supposed to look like a lower case "e." You are basically just wrapping the yarn around a peg in a clockwise motion and moving on to the next peg and doing the same thing over and over. Again, not too tight because you will need to remove loops as you work.

When you complete the whole first row it should look like this.


Push all your loops down to the bottom of the pegs like this.

Now, wrap all the pegs a second time beginning with the first peg and ending with the last peg. Continue to work in the same direction as you did in the first row.

Once you have completed the second row, hold the working yarn in your hand or secure it to the anchor peg. Begin with the last peg wrapped and using the loom tool lift the bottom loop over the top loop. Boye built in a groove in the peg that really makes this easier. Continue this process with each peg, all the way around the loom until you again have only one loop on each peg. Push the loops to the bottom of the pegs.
After you have completed a few rows, release the slip knot from the anchor peg so your knitting can fall inside of the loom.


Continue wrapping the pegs and then lifting the loops until you have knitted the desired length for your project. I kept holding the loom up to my little one's precious head to see how long it needed to be and then I made some extra rows after that so I could roll the brim.

To finish your lovely little knitted hat, you will need to "bind off" which for our purpose, simply means closing the tube you knitted.
When you have knitted your last row and only have one loop on each peg, cut the working yarn leaving about a 24 inch tail. Thread the yarn onto a yarn needle.


Starting with peg 1, insert the needle below the loop and pull the yarn through. Insert the needle into the loop on the next peg and repeat. Repeat with each peg all the way around the loom making sure there is no gap.


Now remove the loops from the pegs.


 Turn your hat inside out and pull the yarn tail until the opening of the "tube" is completely closed.


Secure the opening by stitching back and forth over the opening. Then tie a knot with the yarn tail. (If you want to add a pom pom, stop here and see below, if not, continue with weaving the ends through.) Weave in both the ending and beginning yarn tails at the top and bottom of the hat.

Basically, your lovely little knitted hat is finished!
My Mom thought it would be a fun idea to add a pom pom on top, so she made one and I took the pictures so we could show you how to do that too : )

Take a 4 inch piece of cardboard and begin wrapping the yarn around it. We wrapped it about 30 times.


Now carefully slip the yarn off the cardboard and tie a piece of yarn around the middle, tightly.


With a scissor, cut through the closed loops at each end of the pom pom. Then trim the ends to shape, or leave it wild and woolly if you like : )


Take the needle threaded with the 24 inch yarn tail from your hat and slip it under the yarn you tied around the middle of the pom pom.

Slide the pom pom down the yarn till it meets the hat.

Now secure the pom pom to the hat by stitching back and forth through the top of the hat and tying a knot or two.
I put a lot of photos in this post to help you visualize the instructions, but trust me, this was easy and if I can knit this hat on a loom you can too!!!

***COMING SOON*** 
In the near future, I will be offering supply kits for sale! 
These kits will include the craft supplies necessary to jump right in to select projects from my blog.
Just a few of the kits I'm working on putting together right now are:

  • Lip Balm Kit
  • Handbound Leather Wrapped Journal Kit
  • Hand Rolled Beeswax Pillar Candle
  • Beaded Earrings Kit (upcoming post)

Visit us on Facebook at http://www.facebook.com/MyCreativeMommy and click the "Like" box to become a fan and receive regular updates!


Follow us on Pinterest at http://pinterest.com/mycreativemommy

There are about 196 countries in the world, and my goal is to take the whole world on a creative journey one project at a time. So I want to offer many thanks to all my readers in 76 different countries so far... 

The United States, Israel, Canada, Germany, Australia, the United Kingdom, Russia, France, Malaysia, Italy, the Bahamas, the Philippines, Sweden, Egypt, Columbia, the Netherlands, Spain, the Sudan, Turkey, Mexico, Moldova, Denmark, China, Vietnam, Singapore, Thailand, the Czech Republic, the Ukraine, South Africa, India, Taiwan, Panama, Serbia, Latvia, Argentina, United Arab Emirates, Bosnia and Herzegovina, 
New Zealand, Japan, Bangladesh, Brazil, Switzerland, Bulgaria, Saudi Arabia, Lebanon, Chile, 
Romania, Hungary, Portugal, Indonesia, Guernsey, South Korea, Pakistan, Greece, 
Hong Kong, Poland, Slovenia, Lithuania, Ireland, Belgium, Venezuela, Sri Lanka, Macedonia, 
Trinidad & Tobago, Peru, Ghana, Estonia, Dominica, Nepal, Norway, Slovakia, Croatia, Algeria, 
Finland, Mongolia, Myanmar [Burma], and Lesotho!


Many Blessings,
Jana : )


Sunday, January 13, 2013

Valentine Heart Basket


Just in time for Valentine's Day! 
Make this beautiful handmade paper heart basket for someone you love : )

This was an easy project, here's what you'll need:
Arnold Grummer's PaperMill Complete Kit
Arnold Grummer's PAPERMILL™ Complete Kit
Arnold Grummer's Folding Heart Card Template
Medium Template: Folding Heart Card
Glue
Hole Punch
Flowers
Ribbon, Twine, Vine

If you don't already know how, simply follow the easy directions for making paper at http://arnoldgrummer.com/resources/watch-videos.html using the Folding Heart Card Template.

Once your card is dry, fold card and glue around the side leaving the top open. Punch a hole on each side for your ribbon, fill with pretty little flowers and hang!

Visit us on Facebook at http://www.facebook.com/MyCreativeMommy and click the "Like" box to become a fan and receive regular updates!

Follow us on Pinterest at http://pinterest.com/mycreativemommy

There are about 196 countries in the world, and my goal is to take the whole world on a creative journey one project at a time. So I want to offer many thanks to all my readers in 72 different countries so far... 

The United States, Israel, Canada, Germany, Australia, the United Kingdom, Russia, France, Malaysia, Italy, the Bahamas, the Philippines, Sweden, Egypt, Columbia, the Netherlands, Spain, the Sudan, Turkey, Mexico, Moldova, Denmark, China, Vietnam, Singapore, Thailand, the Czech Republic, the Ukraine, South Africa, India, Taiwan, Panama, Serbia, Latvia, Argentina, United Arab Emirates, Bosnia and Herzegovina, 
New Zealand, Japan, Bangladesh, Brazil, Switzerland, Bulgaria, Saudi Arabia, Lebanon, Chile, 
Romania, Hungary, Portugal, Indonesia, Guernsey, South Korea, Pakistan, Greece, 
Hong Kong, Poland, Slovenia, Lithuania, Ireland, Belgium, Venezuela, Sri Lanka, Macedonia, 
Trinidad & Tobago, Peru, Ghana, Estonia, Dominica, Nepal, Norway, Slovakia, Croatia and Algeria!


Wishing you a happy, healthy New Year,
and Many Blessings,
Jana : )

Friday, January 11, 2013

Making Your Own Bubble Gum!

I'm a big gum chewer. Always have been. I'm polite about it, but nothing stops me. I chewed gum in school, while I had braces, even in church. There are three things I never leave home without...tissues, lip balm, and gum. I think you're getting the idea : )

So when Santa brought my son a make-your-own bubble gum kit for Christmas, I was almost as excited as he was. I was pleasantly surprised by how easy it was to make gum, and how basic the ingredients are. It involves skills that are similar to other types of candy making, and a little kneading (think bread). My son enjoyed it so much he said "This would be a great idea for your blog Mom!" He was right, thanks buddy.

The kit Santa brought can be found at MindWare, Brainy Toys For Kids of All Ages for $19.95. Kids can be very involved in making bubble gum with adult supervision, of course. The method the kit recommends is microwaving the gum base. It worked okay, but it took longer to soften the gum base than the instructions indicated, and it hardened very quickly. This time I tried softening/melting the gum base on the stove to see if it stayed soft and warm a bit longer. It worked much better than the microwave.

Here is what you'll need to make your own bubble gum:
POOF-Slinky 0SA257 Scientific Explorer Bubble Gum Factory Kit
  • One Scientific Explorer Bubble Gum Factory Kit
Kit contains:
Confectioner sugar
Corn Syrup
Citric Acid
Watermelon, Blueberry, Mint flavors
Gum Base
2 Note Cards
1 Resealable Plastic Bag
1 Activity Guide
  • Food Coloring (or not)
I doubled the recipe so I started with 2 Tablespoons of gum base.

Then I used the double boiler method on the stove top to heat the gum base. Just cover the gum base with water and heat on low.

Once the gum base is soft and warm, pour off the water.

As long as it isn't too hot, you can blend the gum base by hand. This makes it nice and smooth even though it is quite sticky.

Next I added 2 Teaspoons of corn syrup to the gum base and stirred with a metal spoon. *Tip-If you keep the gum base in the double boiler it will stay soft and pliable.


This is a fun step because you get to add the flavoring. I mixed in 1 Teaspoon of watermelon flavor powder, but you can add more or less depending on your taste.

Let the kneading begin! I put 2 Tablespoons of confectioner/powdered sugar on waxed paper, removed my gum base and began kneading it into the confectioner sugar. It will start out sticky and become less sticky and more firm. You don't have to use all the confectioners sugar, and if the gum becomes too stiff add a few drops of warm water.


Divide your "dough" in equal halves and add a small amount of green food coloring to one half, and pink food coloring to the other half. I'm a big fan of Wilton products, and they have great food/icing colors.

Thoroughly mix the food coloring into the dough by kneading, and flatten out each half with a roller or by hand. Children will grow weary of kneading so be ready to jump in and relieve them to keep this project fun : )

Once flattened out, place the pink gum on top of the green gum and roll into a log.

Lastly, an adult can use a scissor or sharp knife to snip or slice pieces of gum from the log you just rolled. Then place the pieces in a resealable bag to keep fresh. This gum may be firmer than what your used too, but kids don't seem to care. It really comes out lovely and I think you'll be pleased with the results.


I've been down with the flu and complications from the flu, so I'm glad to finally get a post up for you. Thanks for your patience and hope you enjoy it!


Visit us on Facebook at http://www.facebook.com/MyCreativeMommy and click the "Like" box to become a fan and receive regular updates!

Follow us on Pinterest at http://pinterest.com/mycreativemommy

There are about 196 countries in the world, and my goal is to take the whole world on a creative journey one project at a time. So I want to offer many thanks to all my readers in 72 different countries so far... 

The United States, Israel, Canada, Germany, Australia, the United Kingdom, Russia, France, Malaysia, Italy, the Bahamas, the Philippines, Sweden, Egypt, Columbia, the Netherlands, Spain, the Sudan, Turkey, Mexico, Moldova, Denmark, China, Vietnam, Singapore, Thailand, the Czech Republic, the Ukraine, South Africa, India, Taiwan, Panama, Serbia, Latvia, Argentina, United Arab Emirates, Bosnia and Herzegovina, 
New Zealand, Japan, Bangladesh, Brazil, Switzerland, Bulgaria, Saudi Arabia, Lebanon, Chile, 
Romania, Hungary, Portugal, Indonesia, Guernsey, South Korea, Pakistan, Greece, 
Hong Kong, Poland, Slovenia, Lithuania, Ireland, Belgium, Venezuela, Sri Lanka, Macedonia, 
Trinidad & Tobago, Peru, Ghana, Estonia, Dominica, Nepal, Norway, Slovakia, Croatia and Algeria!


Wishing you a happy, healthy New Year,
and Many Blessings,
Jana : )